Objectives and Logistics
Lab Objective and Summary
This lab has you implement device drivers in a production-ready operating system (OS): the Linux kernel, written in C. Linux is one of the, if not the most widespread OS. It dominates many markets including servers, cloud infrastructure, HPC, and mobile (Android), running on billions of devices, despite its lower desktop/laptop share.
A hardware device is an I/O component (disk, GPU, keyboard, screen, network card, speaker, etc.). A device driver is OS code that directly manipulates a device and exposes a convenient interface for user-space applications to use it via system calls, the mechanism applications use to invoke the OS:
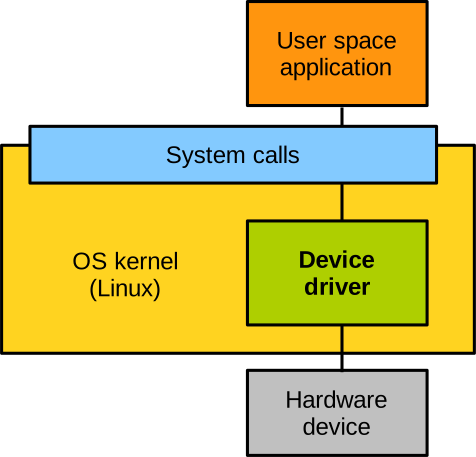
You will follow a process similar to that used by industry contributors to the Linux kernel: given a datasheet describing a device’s OS-facing interface, you write the driver that uses it, calling on Linux kernel APIs (device/driver registration, memory mapping and allocation, I/O memory access, interrupt management, user-space communication, etc.). User-space test applications and test suites validate each device’s operation.
The kernel you modify will run inside a virtual machine emulating the target devices.
Lab Structure
You will write a Linux driver for each of three components, of increasing complexity:
- A synchronous random number generator (RNG). Synchronous means that a request to generate a random number is answered immediately.
- An asynchronous RNG, in which a request is answered after a delay.
- A data compressor.
Guidance decreases across the three: instructions for implementing the synchronous RNG driver are very detailed, the asynchronous RNG less so, and the compressor is implemented with no help beyond the datasheet.
Use of AI and Plagiarism
Use of AI
Generative AI use is mostly authorised for that exercise, but should be used responsibly, i.e., in a way that encourages rather than prevents learning:
- AI use is not recommended for the basic version of the synchronous RNG driver: the relevant part of the brief is guided enough to be completed by simply following instructions, and using AI here will likely prevent you from learning basic concepts needed later.
- Authorised for the enhanced synchronous RNG driver, the asynchronous RNG driver, and the compressor driver, as the brief provides much less guidance for these.
Whenever you use AI, study the code produced until you understand it well: the COMP26020 exam assesses your knowledge of technical aspects of the code produced as part of this exercise, AI-generated or not.
AI may generate code using kernel/C features you’re unfamiliar with and understanding it is part of the exercise. Ask the AI to explain anything you struggle with. If you doubt its output, check alternative sources:
- Linux kernel: the code itself is the best documentation — browse and search definitions/references via Linux Cross Reference.
- C language: covered in the lectures; a more comprehensive reference is cppreference.
- Come to the lab support sessions scheduled on campus, and use the discussion board on Canvas.
Plagiarism
Do not copy code from other students. All submissions are checked electronically for plagiarism, with suspicious cases reported to the administration.
Deadline and Submission Format
The deadline is indicated on the course unit’s page on Canvas; standard University late penalties apply.
The deliverable is a single patch file for the Linux kernel containing your driver code (instructions at the end of this brief), submitted via the CS Department’s GitLab on a repository named 26020-lab1-s-drivers_<your username> associated with your username.
That repository will be created automatically and you do not have to create it yourself or fork another repository.
Push the patch file to the default (main) branch of the repository and create a tag named lab1-submission to mark it ready.
For a brief guide to basic git usage, see here. For a guide on how to use git to submit your coursework, see here.
Submission Checklist
⚠️ ⚠️ ⚠️ Before submitting, please complete this checklist: ⚠️ ⚠️ ⚠️
Failure to follow these instructions will likely result in a mark of 0 for this exercise.
Marking Scheme
| Item | Marks |
|---|---|
| Basic synchronous RNG device access from kernel space | 1 |
| Synchronous RNG driver | 3 |
| Asynchronous RNG driver | 3 |
| Compressor Driver | 3 |
| Total | /10 |
It is highly recommended to complete every part of that exercise in order.
Intended Learning Objectives
Beyond low-level systems software development, this assignment exercises core C and imperative programming skills:
- Structure programs into functions, including function pointers as callbacks, for modular, reusable control flow.
- Express program logic with core imperative constructs for polling, command dispatch, and error handling.
- Use custom data structures, fixed-width integer types, and bitwise operations for hardware register state and command encodings.
- Manipulate raw memory through pointers, using accessor functions over direct dereference when correctness depends on execution order and side effects.
- Use the C preprocessor and header files for shared constants and interfaces, separating declarations from implementation.
Favicon by icons8.com.
Environment Setup
This exercise must be completed in a Docker container. There are two ways to get one:
- Run Docker natively (preferred): this solution is faster in terms of performance, but requires a machine where you can install Docker (e.g., your own laptop, with administrator rights).
- Use a GitHub Codespace: this solution only requires a web browser, which is useful on machines without administrator access (e.g., lab machines). However it is also slower, especially on the free student-accessible tier of Codespace.
Prefer solution 1 when possible; fall back to solution 2 only if you have no access to a machine with Docker.
Running Docker Natively
Installing Docker
Install the Docker container engine following the instructions here: Docker CE (command-line) on Linux, Docker Desktop on Windows/Mac.
Pulling and Launching the Container
Pull the exercise image (only needed once), then run it to get a shell inside the container:
$ docker pull olivierpierre/comp26020-lab
$ docker run -it olivierpierre/comp26020-lab
For Mac users with ARM CPUs: if when running these commands Docker complains about the arm64 image not being available, force the use of the x86-64 image by adding the
--platform linux/amd64option to the command line invocation of Docker:$ docker pull --platform linux/amd64 olivierpierre/comp26020-lab $ docker run -it --platform linux/amd64 olivierpierre/comp26020-lab
In another terminal, list running containers with:
$ docker ps
You can get an extra shell into a running container one with:
$ docker exec -it <container-id> /bin/bash
Exiting the initial shell (ontainer with docker run) will stop the container.
To restart a stopped container and open a shell in it:
$ docker start <container-id>
$ docker exec -it <container-id> /bin/bash
docker ps -a lists all containers, including stopped ones, which is useful to find the ID of a previously stopped container.
docker start runs the container in the background; stop it again with docker stop <container-id>.
Attaching VSCode to a Running Container
The exercise can be done from the command line (e.g., using editors such as vim/nano), but an IDE is more practical.
Install the Dev Containers extension, open the Containers tab in VSCode, right-click a running container and choose Attach Visual Studio Code to open a new window connected to it.
Codespace Environment
This solution requires a GitHub student account.
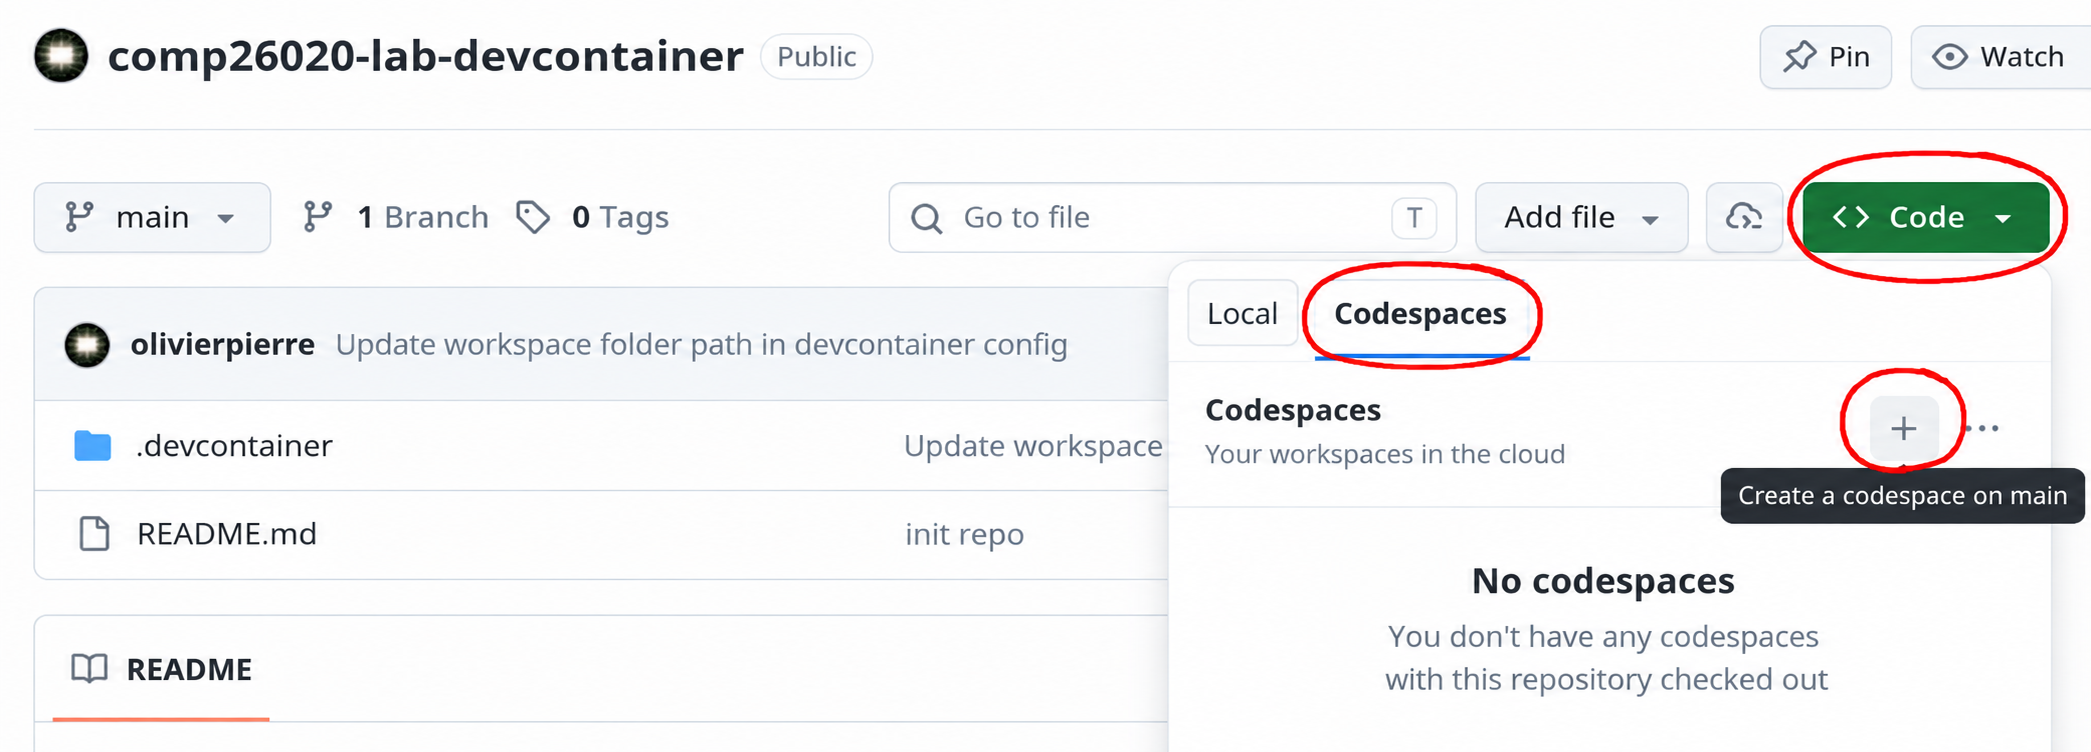
On this repository’s page, click <> Code → Codespaces → + to launch a browser-based VSCode environment.
The first launch takes a few minutes (pulling the container image); later launches are much faster.
You can manage running instances from here.
Understanding the Environment
Container Image Structure
At that stage, you should have a desktop or web-based instance of VSCode connected to the running Docker container.
The main directory for this lab exercise is /root/workspace in the container filesystem, containing:
linux-6.6: a clone of the Linux kernel v6.6 sources you will modify, plus a pre-compiled, vanilla v6.6 kernel binary used as guest OS in a VM.alpine.qcow2: a virtual disk image with a minimal root filesystem for the VM.launch-vm.sh: a script that launches the VM using the pre-compiled kernel inlinux-6.6andalpine.qcow2as the virtual disk.shared-folder: a folder shared between the container and the VM for easy file transfer.
Alpine VM
Launching the VM
Place yourself in a terminal in /root/workspace and run:
root@container:~/workspace# ./launch-vm.sh
Inspect this script to see how the QEMU virtual machine manager/device emulator is invoked.
Note the -kernel parameter (guest kernel binary) and -hda parameter (virtual disk).
After a few seconds you should see the login prompt:
Welcome to Alpine Linux 3.19
Kernel 6.6.0 on an x86_64 (/dev/ttyS0)

alpine login:
🔑 VM Access Credentials. Log in to the VM with the username
rootand the passworda.
The VM runs a minimal Alpine Linux installation, pre-installed with everything needed for the exercise.
You can install extra software with the APK package manager (Alpine’s equivalent of apt-get).
In the VM, we can verify we are running the correct guest kernel:
alpine:~# uname -a
Linux alpine 6.6.0 #1 SMP PREEMPT_DYNAMIC Fri Sep  4 16:12:56 UTC 2026 x86_64 Linux
We can also list the PCI devices attached to the VM:
alpine:~# lspci
00:00.0 Host bridge: Intel Corporation 440FX - 82441FX PMC [Natoma] (rev 02)
00:01.0 Unclassified device [00ff]: Device 1234:cafe (rev 03)
00:02.0 Unclassified device [00ff]: Device 1234:f00d (rev 10)
00:03.0 Unclassified device [00ff]: Device 1234:beef (rev 01)
00:04.0 ISA bridge: Intel Corporation 82371SB PIIX3 ISA [Natoma/Triton II]
00:04.1 IDE interface: Intel Corporation 82371SB PIIX3 IDE [Natoma/Triton II]
00:04.3 Bridge: Intel Corporation 82371AB/EB/MB PIIX4 ACPI (rev 03)
00:05.0 VGA compatible controller: Device 1234:1111 (rev 02)
00:06.0 Ethernet controller: Intel Corporation 82540EM Gigabit Ethernet Controller (rev 03)
00:07.0 Unclassified device [0002]: Red Hat, Inc. Virtio filesystem
The three Unclassified device [00ff] are the hardware components you will write drivers for in the next steps of this exercise.
SSH Access to the VM and File Transfers between the Container and the VM
SSH Access to the VM.
The default console after launch-vm.sh is QEMU’s emulated serial output, which is not always stable (long commands and editors like vim may display poorly).
For a stable console, and to open multiple terminals in the VM, SSH into it instead.
QEMU forwards the VM’s SSH port (22) to port 1022 on the container:
root@container:~/workspace# ssh -p 1022 localhost
Transferring Files between the Container and the VM. The easiest way is to use the shared folder. For example, in the container:
root@container:~/workspace# echo "hello" > shared-folder/hello.txt
And in the VM:
alpine:~# cat shared-folder/hello.txt
hello
Files can also be transferred with scp.
Shutting Down the VM
Shut down the VM with:
alpine:~# halt
Wait until the kernel logs show reboot: System halted, then hit ctrl + a then x to return to the container’s terminal.
You can use this same key combination at any time to abort the VM, e.g. if it hangs or crashes due to a bug in your drivers.
⚠️ ⚠️ ⚠️ Always try to shut down the VM properly with the
haltcommand. Otherwise you risk corrupting the filesystem. If you brick the VM this way, you need to bring up a new container with a clean virtual disk, and transfer your work.
QEMU sometimes leaves the container’s console garbled on exit.
If a command longer than one line displays badly, run reset in the container to fix it.
Linux Sources
Source Tree
The full Linux kernel v6.6 source tree is at /root/workspace/linux-6.6.
Notable top-level folders include:
arch, containing the architecture-specific code.mm, containing code related to memory management.fs, containing the code of all filesystems supported by Linux.init, containing the kernel initialisation C code.drivers, containing the code for drivers.include, containing the kernel header files.
In this exercise we will add new code to the last three folders.
Rebuilding the Kernel
Any modification to the sources of Linux requires rebuilding the kernel and relaunching the VM to take effect. To rebuild the kernel, from the root of the source tree:
root@container:~/workspace/linux-6.6# make
The build is incremental (only modified sources are recompiled) but may still take a bit of time, especially in slow environment (e.g., GitHub Codespaces).
The resulting guest kernel binary is arch/x86_64/boot/bzImage.
Relaunching the VM after a Kernel Rebuild. Using
rebootfrom within the VM after a new kernel is built will not load that new kernel, and the old version present in the VM’s memory will rather be reused. To effectively load a new kernel, you need to shut down the machine withhalt, hit ctrl + a then x, and finally relaunch thelaunch-vm.shscript.
Background: I/O Device Access in Computer Systems
Here we briefly present how an OS communicates with I/O devices.
Overview
There are three ways for the OS and devices to interact:
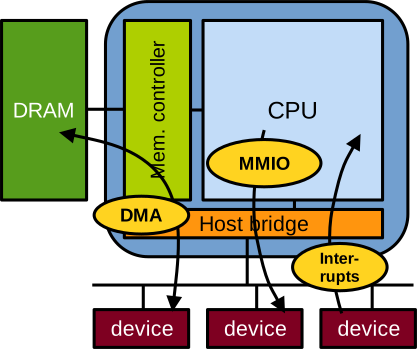
Memory-mapped I/O (MMIO) maps device registers into the OS address space, so reading/writing those addresses reads/writes the device’s registers directly. It is unidirectional (OS to device) and limited to small, register-sized messages. For example, the OS enables networking on a network card through MMIO.
Interrupts are unidirectional notification signals sent from the device to the OS; they carry no data. For example, a network card raises an interrupt to tell the OS a packet has arrived and should be fetched.
Direct memory access (DMA) is bidirectional and transfers large quantities of data between memory and the device. With our network card example, sending/receiving network packets between the host and the device is done through DMA. DMA transfers use ring buffers in memory (producer-consumer channels): the OS uses MMIO to give the device the ring buffer’s base address, length, and head/tail pointer locations, and MMIO/interrupts then coordinate the transfers.
In this exercise we will write drivers for devices using MMIO and interrupts only (no DMA).
Memory-Mapped I/O
An I/O device exposes a series of registers, each with a specific size (e.g., 32 bits) and access mode (read-only, write-only, or read-write), that the OS reads and writes with MMIO. For example, a network card may expose:
- A read-only STATUS register encoding its current state: transmitting/receiving, idle, etc.
- A write-only COMMAND register for the OS to trigger actions: send a packet, reset the device, etc.
- A read-write CONTROL register for configuring the device and reading back its configuration.
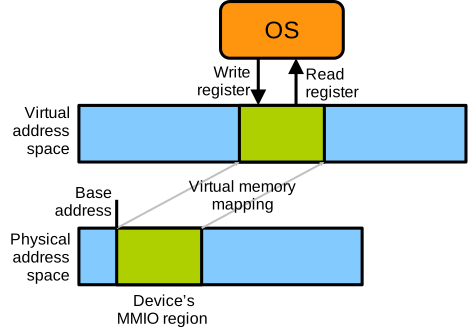
At boot time, the motherboard firmware (BIOS/UEFI) configures the hardware so that CPU LOAD/STORE instructions at certain addresses are directed to devices’ registers. Each device is thus assigned a contiguous area of the physical address space, its MMIO area, for the OS to read and write its registers. The physical address of that area’s first byte, its base address, is stored in a PCI configuration-space register called the Base Address Register (BAR). Each register the device exposes is identified by a specific offset from that base address. For a real-world example, see page 447 of the Intel 82576EB Ethernet controller datasheet, which lists exposed registers with their BAR offset, name, and access mode.
Once virtual memory is enabled at boot time, LOAD/STORE instructions can only target virtual addresses. The OS therefore maps each device’s MMIO area into its own virtual address space, after which it accesses the device’s registers by reading/writing that virtual memory area, as illustrated below:
In the development environment you should have up and running, you can list the PCI devices attached to the VM and see their physical base address as follows:
alpine:~# lspci -v
# ...
00:01.0 Unclassified device [00ff]: Device 1234:cafe (rev 03)
	Subsystem: Red Hat, Inc. Device 1100
	Flags: fast devsel
	Memory at febd0000 (32-bit, non-prefetchable) [size=4K]
	Kernel driver in use: edu_rng_sync

00:02.0 Unclassified device [00ff]: Device 1234:f00d (rev 10)
	Subsystem: Red Hat, Inc. Device 1100
	Flags: fast devsel, IRQ 10
	Memory at febd1000 (32-bit, non-prefetchable) [size=4K]

00:03.0 Unclassified device [00ff]: Device 1234:beef (rev 01)
	Subsystem: Red Hat, Inc. Device 1100
	Flags: fast devsel, IRQ 11
	Memory at feb80000 (32-bit, non-prefetchable) [size=128K]
# ...
The physical base address for each device follows Memory at and is given in hexadecimal.
Interrupts
Interrupts let a device notify the OS when relevant events occur, and are sent from the device to the CPU. At boot time, the CPU is configured to jump, for each interrupt type, to a predefined piece of OS code upon reception: this is called an interrupt handler. Handlers exist because interrupts are asynchronous: the CPU is generally busy (running an application or the OS) when one arrives. On reception, the context (CPU register values) of whatever was running) is saved to memory, and the CPU jumps to the handler. The handler reacts to the interrupt, e.g., fetching a packet the network card has signalled as received, then acknowledges it to the device and restores the saved context, so that application and OS code are interrupted transparently.
Assume a hypothetical scenario in which an application regularly prints messages to the console, and an OS has installed the following interrupt handler:
// OS code, interrupt handler:
void interrupt_handler() {
    printk("interrupt received!\n");    // printk is the kernel's equivalent of printf
    /* handle the interrupt ... */
    ack_interrupt();
    return;
}

// application code running at the time the interrupt is received:
void app_code() {
    for(int i=0; i<10000; i++) {
        printf("iteration %d ...\n", i);
        sleep(1);
    }
}
If the interrupt is received while the application runs, we may see the following:
# ...
iteration 42
iteration 43
iteration 44
interrupt received!
iteration 45
iteration 46
# ...
Handling an interrupt generally involves MMIO or DMA with the device, e.g. to check the reason for the interrupt or retrieve data. In the Intel Ethernet controller datasheet, the interrupt reason is encoded in the ICR MMIO register (page 504).
Synchronous RNG: Device Description
The first hardware device we will consider is a synchronous random number generator. It is a simple source of random numbers that we wish to expose to user-space applications. Our RNG device is connected to the host computer (the VM in our setup) on the PCI bus. Like most approaches to random number generation in computer systems, our RNG generates sequences of random numbers that must be initialised with a seed.
It exposes only two functions accessible from the host OS through MMIO:
- Obtaining a random number, by having the host read an MMIO register. That is the primary function of the device.
- Seeding the random number generator, achieved by writing an MMIO register.
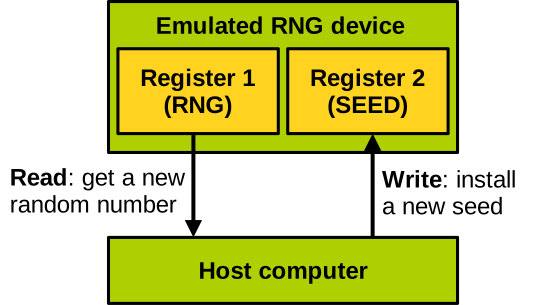
The device is synchronous, meaning that every operation completes immediately upon the MMIO transaction, and the host does not need to manage any asynchronous completion mechanisms.
The following document is the datasheet of our educational synchronous RNG:
🗎 EDU‑RNG‑SYNC: Educational Synchronous Random Number Generator PCI Device
Please read it carefully to get a good understanding of the device’s behaviour and the interface it exposes to the host for its operation. The datasheet gives:
- An overview of the component’s behaviour and features.
- PCI identification information, numeric values the host OS uses to recognise this specific device on the PCI bus.
- Memory map and register descriptions for MMIO.
- Further information helpful for driver development, such as predefined constants for PCI identification and register offsets from the BAR.
Synchronous RNG: Basic Device Access from Kernel Space
Before writing a proper driver, let’s see how we can access the device with MMIOs from the guest OS kernel code. To that end, we can make a small modification to the Linux guest kernel sources and insert some calls to the device. For the sake of simplicity, we’ll insert these calls at the end of the boot process, when the system is well initialised but without involving user space.
Locating the Kernel Main Function
The kernel is a computer program like any other, and as such it has an entry point.
This entry point is written in assembly, but after a short early initialisation, the CPU will jump to C code.
More precisely, the C entry point of the kernel is the function start_kernel, which is implemented in the Linux sources in the file init/main.c, starting line 870.
If you check out its implementation, you’ll see that start_kernel initialises many subsystems and then calls arch_call_rest_init, which itself calls rest_init.
rest_init spawns a kernel thread that runs the kernel_init function.
The kernel_init function, which implementation starts on line 1428, finalises the initialisation of the system and then starts the first user-space application.
This is a suitable point in the boot process to insert our test calls to the device: we are still in kernel space, and the system is fully initialised.
Inserting Test Calls to the Device
Our test will perform the following steps:
- Seed the RNG with a fixed seed, e.g.
0x42. - Generate five random numbers and print them to the kernel log.
Steps 1 and 2 will be repeated twice, so we can check that the five random numbers generated from the same seed are the same in both iterations.
In the kernel_init function, add the following code after the call to do_sysctl_args(); (line 1460):
printk("------------------------------------------------------------------\n");
printk("BEGIN EDU-RNG-SYNC TEST\n");
printk("------------------------------------------------------------------\n");

// Base address of the device's registers in physical memory (the value
// held in the device's Base Address Register, BAR). Use the PCI
// identification information present in the datasheet as well as the
// output of lspci -v in the VM to find it.
unsigned long bar = /* TODO complete here */;

// MMIO register offsets, see datasheet
unsigned long ran_reg_offset = /* TODO complete here */;
unsigned long seed_reg_offset = /* TODO complete here */;

// Map the area of physical memory corresponding to the device's registers
// (starting at the base address, size 4KB) somewhere in virtual memory at
// address devmem.
void *devmem = ioremap(bar, 4096);
if(devmem) {

    unsigned int data = 0x0;

    for(int i=0; i<2; i++) {
        // seed with 0x42 by writing that value in the seed register
        iowrite32(0x42, devmem + seed_reg_offset);

        // obtain and print five random numbers by reading the relevant
        // register
        for(int j=0; j<5; j++) {
            data = ioread32(devmem + ran_reg_offset);
            printk("Round %d number %d: %u", i, j, data);
        }
    }
} else {
    printk("ERROR: cannot map device registers\n");
}

printk("------------------------------------------------------------------\n");
printk("END EDU-RNG-SYNC TEST\n");
printk("------------------------------------------------------------------\n");
You will need to complete the initialisation of the base address and register offset variables. A few notable points about this code:
-
We use
printkto print to the kernel log. It is the kernel version of theprintffunction you are familiar with in user space. Withprintk, we display when the test starts and ends so that the test’s output is clearly visible in the kernel log. -
The test code starts by mapping the physical memory where the device’s registers are present into virtual memory at an address pointed to by
devmem. This is achieved with theioremapfunction, which takes as parameters the physical address to map into virtual memory, as well as the size of the area to map (here one page, i.e. 4 KB, as defined in the datasheet). Under the hood the kernel will update the page table to realise the mapping and flush translation caches if needed. -
Once the device’s registers are mapped into virtual memory, we can read and write to them using the accessors
ioread32andiowrite32. It is important to use these functions rather than reading from or writing to memory directly (e.g.,data = *(devmem + ran_reg_offset)). Indeed, device access are specific memory access operations that require special care to be successful.ioread/writeensure important properties such as bypassing the CPU caches, disabling compiler optimisations, and inserting memory barriers that prevent the compiler or CPU from reordering the corresponding instructions.
Launching the Test
Once the test code is ready, you can recompile the guest Linux kernel:
$ cd ~/workspace/linux-6.6
$ make
When you launch the VM with this newly compiled kernel, assuming your code is correct, you should see in the log at the end of the kernel boot process something like this:
[    3.519214] ------------------------------------------------------------------
[    3.519510] BEGIN EDU-RNG-SYNC TEST
[    3.519620] ------------------------------------------------------------------
[    3.520024] Round 0 number 0: 286129175
[    3.520046] Round 0 number 1: 1594929109
[    3.520199] Round 0 number 2: 971802288
[    3.520394] Round 0 number 3: 222134722
[    3.520559] Round 0 number 4: 1335014133
[    3.520754] Round 1 number 0: 286129175
[    3.520918] Round 1 number 1: 1594929109
[    3.521073] Round 1 number 2: 971802288
[    3.521227] Round 1 number 3: 222134722
[    3.521406] Round 1 number 4: 1335014133
[    3.521545] ------------------------------------------------------------------
[    3.521965] END EDU-RNG-SYNC TEST
[    3.522101] ------------------------------------------------------------------
As you can see, for each round the sequence of generated random numbers is the same, which confirms that we are accessing the device correctly. Once the VM has booted, you can print the kernel log with the following command:
alpine:~# dmesg
⚠️ ⚠️ ⚠️ Do not remove this small test from the kernel boot code, its presence (and successful implementation) is worth 1 mark.
Synchronous RNG: Writing the Driver
In the previous chapter we accessed the EDU-RNG-SYNC device directly from code inserted in kernel_init.
This confirmed that we can talk to the device correctly, but it is not how a real driver works: our test code was not reusable, was not exposed to user-space applications, and lived in the wrong place (the kernel’s boot sequence, rather than a dedicated driver file).
We will now write a proper Linux driver for the EDU-RNG-SYNC device. This driver will:
- Be a self-contained piece of kernel code, compiled as part of the kernel image, that initialises itself once at boot.
- Map the device’s registers into kernel virtual memory, exactly like we did in the previous part of the exercise.
- Expose the device to user-space applications as a character device, i.e. a special file (also called pseudo-file), typically under
/dev, that applications canopen()and interact with. - Define a small custom interface, based on
ioctl(), so that user space can ask the driver to generate random numbers or to seed the generator.
Where the Driver Lives in the Kernel Source Tree
Real Linux drivers do not live inside core kernel files such as init/main.c; they live in their own source files, generally under drivers/, grouped by subsystem (drivers/net for network cards, drivers/gpu for graphics cards, etc.).
Our RNG device does not fit any existing subsystem, so, like many simple/educational devices, we will place it in drivers/misc, a directory reserved (per its own Makefile’s comment) for “misc devices that really don’t fit anywhere else”.
Create a new, empty file for our driver:
root@container:~/workspace/linux-6.6# touch drivers/misc/edu-rng-sync.c
For the kernel build system to actually compile this file into the kernel image, you need to reference it from drivers/misc/Makefile.
Open that file and add the following line, near the top:
obj-y += edu-rng-sync.o
obj-yvsobj-m. In the kernel build system,obj-ymeans “always compile this file into the kernel image” (the code is built-in), whereasobj-mmeans “compile this file separately as a dynamically loadable module” (a.kofile inserted at runtime withinsmodand removed withrmmod). Since the deliverable for this exercise is a single kernel source patch, and to keep things simple, we compile our RNG driver as built-in, usingobj-y. One consequence is that our driver will always be initialised, once, very early during every boot of the VM, and that it can never be unloaded at runtime.
From now on, every time you run make in linux-6.6, this new file will be compiled (as long as it contains valid C) and linked into arch/x86_64/boot/bzImage, just like any other kernel source file.
Recap: Kernel Modules, module_init and module_exit
Despite being built-in rather than dynamically loadable, we still write our driver using the standard Linux kernel module API. Every Linux driver, whether built-in or loadable, follows the same basic skeleton:
- An initialisation function, registered with the
module_init()macro, called exactly once, either at boot (built-in code) or when the module is loaded (insmod, loadable code). This is where a driver typically discovers/maps its device and registers itself with the relevant kernel subsystems. - A cleanup function, registered with the
module_exit()macro, called when the compute shuts down ((built-in code) or when the module is removed (rmmod). Because our driver is built-in, nothing will ever call this function while the VM runs. We still define it, both as good practice and because it is expected of every properly structured Linux driver.
Mapping the Device’s Registers
The first part of our driver’s initialisation function is the same thing you already did in the previous chapter: map the device’s MMIO area with ioremap, using the BAR (physical base address) you previously determined with lspci -v, and store the resulting kernel virtual address in a global variable so that the rest of the driver (in particular, the ioctl handler we will write below) can use it:
#include <linux/ioctl.h>
#include <linux/init.h>
#include <linux/module.h>
#include <linux/kernel.h>
#include <linux/fs.h>
#include <linux/uaccess.h>
#include <linux/io.h>

#define DEVICE_BASE_PHYS_ADDR   /* TODO complete here */

void *devmem = 0x0;

static int __init edu_rng_sync_init(void) {
    devmem = ioremap(DEVICE_BASE_PHYS_ADDR, 4096);

    if(!devmem) {
        printk(KERN_ERR "Failed to map device registers in memory");
        return -1;
    }

    /* the rest of initialisation goes here, see below */

    printk(KERN_INFO "edu_rng_sync driver loaded\n");
    return 0;
}
Notice the optional macro coming before the first parameter passed to printk, indicating the level of log: information, error, warning, etc.
Exposing the Device as a Character Device
Now that we can talk to the device’s registers from kernel code, we need a way for user-space applications to trigger these MMIO accesses.
Linux drivers expose themselves to user space through device pseudo files, special entries typically found under /dev (e.g. /dev/sda, /dev/tty0).
There are several kinds of device files; we are interested in character devices here, which are accessed sequentially, one “unit” of data at a time (as opposed to block devices, such as disks, addressable in fixed-size blocks).
Whenever user space performs a system call (open, read, write, ioctl, close, …) on a device file, the kernel’s virtual filesystem layer forwards it to the driver responsible for that device, by calling the corresponding function pointer stored in a struct file_operations:
static struct file_operations my_fops = {
    .unlocked_ioctl = my_ioctl,
};
We will implement my_ioctl in a moment.
For now, note that we only fill in the .unlocked_ioctl field: our device does not need .open, .read, .write, etc., since all interactions with it will happen through a single custom ioctl interface (see below for why).
To make the kernel aware of our character device, we must register it, from our init function, with the register_chrdev function, which takes a major number, a name, and a file_operations structure.
Every character device is identified by a pair of (major, minor) numbers: the major number identifies the driver responsible for the device, and the minor number distinguishes between several devices handled by the same driver.
We only have one device, so we won’t worry about minor numbers here.
Some major numbers are reserved for well-known devices; by convention, a range of numbers is set aside for local/experimental drivers such as ours.
For this exercise we simply pick an arbitrary, currently unused major number, e.g. 255.
At the top of the source file near the other #define, add the following constant definition:
#define CHARDEV_MAJOR_NUMBER 255
Add the registration call to edu_rng_sync_init, right after the ioremap call:
if (register_chrdev(CHARDEV_MAJOR_NUMBER, "edu_rng_sync", &my_fops) < 0) {
    printk(KERN_ERR "Failed to register edu_rng_sync\n");
    return -1;
}
The string "edu_rng_sync" is simply the name that will appear for our driver in /proc/devices; it is not the same thing as the path of a device file in /dev.
register_chrdev does not create that device file for us: we will have to create it ourselves, manually, with the mknod command, in the VM once the driver is loaded.
This is covered in the next part of the exercise, when we start writing user-space code that needs to open() the device.
Defining an ioctl-Based Interface
Our device supports exactly two operations, “generate and return a random number” and “seed the generator”, neither of which maps naturally onto the generic read()/write() system calls (in particular, “generate a number” is triggered by reading a device register, but is conceptually closer to a command than to reading a byte stream).
This kind of situation, a device-specific command with optional input and/or output data, is precisely what the ioctl() system call was designed for.
An ioctl() call from user space looks like ioctl(fd, request, arg), where fd is the open file descriptor for our device, request is a driver-specific numeric command, and arg is an optional argument, typically a pointer to a user space value/data structure for the driver to read from and/or write to.
On the kernel side, our .unlocked_ioctl handler receives the same cmd and arg, and decides what to do based on cmd.
Kernel convention (see the kernel documentation on ioctl numbers) is to build request/cmd values with the _IO, _IOR, _IOW, _IOWR macros, which encode a “magic” character identifying our driver, a sequence number, and the size/direction of the associated data. Define our two commands right after the includes:
#define EDU_RNG_SYNC_IOCTL_RAND _IOR('q', 1, unsigned int)
#define EDU_RNG_SYNC_IOCTL_SEED _IOW('q', 1, unsigned int)
EDU_RNG_SYNC_IOCTL_RAND uses _IOR (“read”, i.e. data flows from the kernel to user space): calling it makes the driver return a random number to the caller.
EDU_RNG_SYNC_IOCTL_SEED uses _IOW (“write”, data flows from user space to the kernel): calling it lets the caller supply a new seed value.
In both cases the associated data is a single unsigned int, matching the width of the device’s registers.
If you expand these macros (or simply print their value on the kernel log), you will find that EDU_RNG_SYNC_IOCTL_RAND evaluates to 0x80047101 and EDU_RNG_SYNC_IOCTL_SEED to 0x40047101: the top bits encode the direction (read/write), the next bits the size of the data (4 bytes), then the magic character 'q' (0x71), and finally the sequence number (1).
These two constants need to be known both by the driver (to implement
my_ioctl) and by any user-space application wanting to use the device (to know what value to pass toioctl()). For now, we simply duplicate these#defines in the user-space test application we will write in the next part of the exercise; sharing a single definition between kernel and user space is left as a known limitation that we will address soon in an enhanced version of the driver.
Implementing the ioctl Handler
We can now write my_ioctl, the function referenced by .unlocked_ioctl above:
static long my_ioctl(struct file *file, unsigned int cmd, unsigned long arg) {
    unsigned int data = 0x0;

    switch (cmd) {
        // Get a new random number
        case EDU_RNG_SYNC_IOCTL_RAND:
            /* Application requests a new random number */
            /* TODO implement that feature */

            break;

        // Seed the RNG
        case EDU_RNG_SYNC_IOCTL_SEED:
            /* Application requests to seed the RNG */
            /* TODO implement that feature */

            break;

        default:
            return -ENOTTY; // unknown command
    }

    return 0;
}
Here the cmd parameter contains the exact ioctl command that was issued by the application.
We use a switch statement to separate the processing according to what the application requests, either EDU_RNG_SYNC_IOCTL_RAND or EDU_RNG_SYNC_IOCTL_SEED.
It will be your responsibility to implement these commands. Draw inspiration from how we accessed the device in the previous section of this exercise. A few important points to note:
- When either reading or writing data from/to the device through
ioctl, theargparameter will contain:- The address in user space of the data to write to the device, in the case of a write operation.
- The address in user space where the data to be read should be stored, in the case of a read operation.
- It is unsafe for the kernel to read/write from/to user-space addresses directly: a malicious user-space application could have, for example, passed a
NULLwith the aim to crash to the kernel. To properly access these addresses, you need to usecopy_to_userwhen copying data read from the device into user-space memory, andcopy_from_userwhen reading data from user space in order to write it to the device. See here for these functions’ prototypes and examples of their usage. Both functions perform various security checks on the user space buffer for the kernel to access.
Cleaning Up: the Exit Function
To complete the driver, add the cleanup function, undoing everything the init function set up, in reverse order:
static void __exit edu_rng_sync_exit(void) {
    unregister_chrdev(CHARDEV_MAJOR_NUMBER, "edu_rng_sync");

    if(devmem)
        iounmap(devmem);

    printk(KERN_INFO "edu_rng_sync driver unloaded\n");
}
And register both functions with the kernel module API, at the end of the file:
module_init(edu_rng_sync_init);
module_exit(edu_rng_sync_exit);
Building and Verifying the Driver Loads
With the code of your driver complete, rebuild the kernel and relaunch the VM as usual:
root@container:~/workspace/linux-6.6# make
Once the VM has booted, check the kernel log for the message our driver prints on initialisation:
alpine:~# dmesg | grep edu_rng_sync
[    x.xxxxxx] edu_rng_sync driver loaded
You can also confirm that the character device was correctly registered, with the major number you chose, by inspecting /proc/devices:
alpine:~# cat /proc/devices | grep edu_rng_sync
255 edu_rng_sync
If both checks succeed, the driver is correctly loaded and registered.
Note that there is, at this stage, still no /dev/edu_rng_sync file: nothing has created it yet, and no user-space application can talk to the driver.
We fix this next and write a small test application exercising both ioctls.
Synchronous RNG: Driver Access from User Space
With the kernel, now including our driver, running in the VM, we can write a simple user-space application that makes use of the device through the driver. After it has booted, we need to create a device file in the VM that we will use to communicate with the driver:
alpine:~# mknod /dev/edu_rng_sync c 255 0
Make sure to use the same major number (here, 255) that you hardcoded earlier in the driver code.
In the VM, create the following C source file (you can do it directly in the VM with a command-line text editor such as vim or nano, or edit the file from VSCode in the container after placing it in the shared-folder, which is also accessible from the VM):
// test.c

#include <stdio.h>
#include <fcntl.h>
#include <unistd.h>
#include <sys/ioctl.h>

#define EDU_RNG_SYNC_IOCTL_RAND _IOR('q', 1, unsigned int)
#define EDU_RNG_SYNC_IOCTL_SEED _IOW('q', 1, unsigned int)

int main() {
    int fd = open("/dev/edu_rng_sync", O_RDWR);
    if (fd < 0) {
        perror("Failed to open the device file");
        return -1;
    }

    unsigned int seed = 0x0;
    unsigned int random_number = 0;

    for(int i=0; i<2; i++) {

        // seed the generator
        if(ioctl(fd, EDU_RNG_SYNC_IOCTL_SEED, &seed)) {
            perror("ioctl seed");
            return -1;
        }

        printf("Device seeded with %d\n", seed);

        // get 5 random numbers
        for (int j=0; j<5; j++) {
            if(ioctl(fd, EDU_RNG_SYNC_IOCTL_RAND, &random_number)) {
                perror("ioctl rand");
                return -1;
            }

            printf("Round %d number %d: %u\n", i, j, random_number);
        }
    }

    close(fd);
    return 0;
}
This user-space application, when executed in the VM, calls the driver in the OS to make use of our device. Study its code and note the following:
- We have the exact same calls to the macros
_IORand_IOWas in the driver code to define the ioctl commands. This will let the driver recognise the commands sent from user space. - The device pseudo-file we created represents the interface between user space and the driver code in the kernel. It is opened by the application in read-write mode; the application then sends ioctl commands to seed the generator and obtain random numbers.
If everything works well, you should see the same behaviour as our test integrated in the boot process: twice the same series of random numbers.
Assuming the application’s code lives in the VM in /root/shared-folder/test.c:
alpine:~# cd shared-folder
alpine:~/shared-folder# gcc test.c -o test
alpine:~/shared-folder# ./test
Device seeded with 0
Round 0 number 0: 1804289383
Round 0 number 1: 846930886
Round 0 number 2: 1681692777
Round 0 number 3: 1714636915
Round 0 number 4: 1957747793
Device seeded with 0
Round 1 number 0: 1804289383
Round 1 number 1: 846930886
Round 1 number 2: 1681692777
Round 1 number 3: 1714636915
Round 1 number 4: 1957747793
If you run into problems, you should debug your kernel and application code.
The application can be debugged with printf calls and gdb, and the kernel code with printk calls.
Synchronous RNG: Enhancing the Driver
Limitations
The driver we wrote in the previous chapter of the exercise is not very robust, and presents a number of limitations:
- The base physical address where the device’s MMIO registers are located is hardcoded in the driver’s code. If that address changes, which can happen for many reasons, e.g., another PCI device is plugged in or removed, the driver will stop working.
- The device file
/dev/edu_rng_synchas to be created manually by a system administrator, and its major number is hardcoded (255) in our example. If another driver initialises before ours and requests 255, our driver won’t be able to load. - The ioctl command definitions are duplicated between the kernel and user-space code: if we update these definitions on the driver side and forget to do so in the application code, things will break.
Addressing the Limitations
Your goal for this part of the exercise is to address all these limitations. This part is less guided, and it is acceptable to use AI to address these issues. Still, please make sure to use it responsibly: you need a good understanding of the code you produce here, as the exam for COMP26020 will include technical questions on that content.
A few hints on how to address the aforementioned limitations:
- BAR: discover it dynamically via the PCI subsystem (
pci_register_driver, apci_device_idtable, aprobecallback,pci_enable_device+pci_iomap) instead of hardcoding it. - Device file / major number: use
alloc_chrdev_region+cdev_init/cdev_addfor a dynamic major, andclass_create+device_createso/dev/edu_rng_syncappears automatically, nomknodneeded. - Shared definitions: put the ioctl macros and device name in a header under
include/uapi/misc/in the kernel tree, included by both the driver and (once exported/copied) the user-space application. To export the kernel’s user-space API headers from the container to the VM, you can use the following command (make sure the VM is running):
root@container:~/workspace/linux-6.6# make headers_install INSTALL_HDR_PATH=/tmp && scp -P 1022 -r /tmp/include/* localhost:/usr/include/
Make sure to run this command every time you update the kernel’s user-space API header file.
Also, study the code of the test application and test suite mentioned below to understand how they interface with the driver.
Testing the Driver
Once you are happy with your code, compile and run the application present in shared-folder/edu-rng-sync-app.c as well as the test suite present in shared-folder/edu-rng-sync-test-suite.c in the VM to check that the driver works fine.
Please study the code of the application and test suite, and note that the definitions of (1) the device file representing the character device, and (2) the ioctl commands, are expected to be present in a header file misc/edu-rng-sync.h shared between the driver and the application (see the third hint above). The name of the device file should be defined by the macro EDU_RNG_SYNC_DEVICE_NAME, and the two ioctl commands should be named EDU_RNG_SYNC_IOCTL_RAND and EDU_RNG_SYNC_IOCTL_SEED.
Make sure your driver’s implementation and the kernel’s user-space API header file adhere to these conventions, as you will only submit your modifications to the kernel (driver code + kernel headers) and the test suite itself will be used unmodified to mark your work.
The output of the application should be similar to the test program we saw previously. A successful run of the test suite looks as follows:
alpine:~/shared-folder# gcc edu-rng-sync-test-suite.c -o edu-rng-sync-test-suite
alpine:~/shared-folder# ./edu-rng-sync-test-suite
[PASS] test_basic_random
[PASS] test_multiple_randoms
[PASS] test_seed_reproducibility
[PASS] test_different_seeds
[PASS] test_seed_zero
[PASS] test_seed_max
[PASS] test_invalid_ioctl
[PASS] test_rand_bad_pointer
[PASS] test_seed_bad_pointer
[PASS] test_stress

Passed: 10
Failed: 0
Another Limitation: Concurrent Accesses
Our device and its driver are not robust against concurrent accesses from multiple processes or threads. For example, assume two processes A and B accessing the device concurrently: B could overwrite the seed set by A and influence the random numbers seen by A. Fixing that issue would require not only updating the driver code, but also the emulation model for the device. Although any production-ready solution would need to support concurrent access, fixing that issue is out of scope for this exercise: we simply assume that the driver and device are accessed by a single program and thread at a time.
Asynchronous RNG: Device Description
We will next consider a different type of RNG hardware device. This version of the component is asynchronous, meaning that after receiving a request to generate a new random number, the host must wait a certain delay before that number becomes available in the corresponding device register. Hence, after requesting a random number, the host needs a way to know when that number becomes available to be read from the device. This is achieved by either having the driver poll a device status register, or by having the device send an interrupt to the host when a requested number is ready to be read.
The following document is the datasheet of our educational asynchronous RNG:
🗎 EDU‑RNG‑ASYNC: Educational Asynchronous Random Number Generator PCI Device
Please read it carefully to get a good understanding of the device’s behaviour and the interface it exposes to the host for its operation.
Asynchronous RNG: Writing the Driver
Implement the driver for the asynchronous RNG in the kernel source tree, in a new file named drivers/misc/edu-rng-async.c.
The user-space API exposed by the driver should be similar to that of the synchronous RNG: a character device /dev/edu_rng_async should be created, supporting two ioctl operations: EDU_RNG_ASYNC_IOCTL_RAND and EDU_RNG_ASYNC_IOCTL_SEED.
A kernel user-space API header file edu-rng-async.h should share the device file name and ioctl definitions with user space.
Make sure to reuse the knowledge you gained during the development of the driver for the synchronous device. This part of the exercise is less guided vs. how we proceeded with the synchronous RNG, and you can use AI tools responsibly to implement the driver. Once again we assume no concurrent accesses: the device and its driver are accessed by a single process/thread at a time.
Hints
Two implementation strategies are possible for detecting completion of a generation operation.
Polling Version
- Polling with a timeout: poll the
STATUSregister for theREADYbit after writingCOMMAND, usingreadl_poll_timeout()to avoid busy-spinning. - No interrupt registered: explicitly disable the device’s INTx assertion (
pci_intx(pdev, 0)).
Interrupt-Driven Version
- Interrupt registration: enable the device’s legacy PCI INTx line and register a handler with
request_irq(), checkingIRQ_STATUS/RANDOM_READYand returningIRQ_NONEappropriately, since INTx may be shared. - Synchronisation: use a
struct completion, signalled by the handler after it acknowledgesIRQ_STATUS(write-one-to-clear), and waited on with a timeout from the ioctl path. - Cleanup: free the IRQ and complete any waiters in your driver code’s
remove()/error paths.
The interrupt-based wait is clearly the superior approach here, as the waiting driver code can sleep without wasting CPU cycles on polling, and is woken up as soon as the generated random number is ready.
Testing the Driver
Use the application (edu-rng-async-app.c) and the test suite (edu-rng-async-test-suite.c) present in shared-folder/ to check the validity of the driver.
These programs are very similar to the ones used for the synchronous RNG.
The main difference is that they use a different kernel user-space API header defining the specific device file name and ioctls for the asynchronous device mentioned above.
The stress test in the test suite also runs for a lower number of iterations, as obtaining a random number takes more time with the asynchronous component due to the generation delay.
Compressor: Device Description
We now consider a third and last device: a hardware compressor. It accepts as input a stream of data (e.g., from a file), and outputs a compressed version of that stream. The device implements the DEFLATE compression algorithm, which is used by the zlib library and many file formats such as zip, gzip, PNG, etc. All aspects of the device are detailed in its datasheet:
🗎 EDU‑COMPRESSOR: Educational Streaming Compressor PCI Device
Please read it carefully to get a good understanding of the device’s behaviour and the interface it exposes to the host for its operation.
Compressor: Writing the Driver
The goal is to write a driver for the compressor: use the datasheet and everything you have learned implementing the RNG drivers to do so. It is acceptable to use AI responsibly to implement the compressor driver. Once again we assume no concurrent accesses.
User-Space Interface
Your driver must expose the compressor as a single character device /dev/edu-compressor.
Sending data to compress and retrieving compressed data should be done using the ordinary open/read/write/poll system calls.
A user-space program opens the device (optionally with O_NONBLOCK) and then write()s chunks of the raw input stream to submit them for compression, and read()s back the resulting DEFLATE/zlib bytes as they become available.
Compression is asynchronous and the device’s internal buffers are finite, hence write() can legitimately accept fewer bytes than requested (or fail with EAGAIN in non-blocking mode) when the device isn’t ready for more input.
Similarly, read() can return EAGAIN or 0 bytes when no compressed output is ready yet.
This is exactly the situation poll() is meant for: the driver should report POLLOUT when another submission is legal and POLLIN when drained output is available, letting the application interleave feeding input and draining output without busy-waiting.
The driver should also expose a small set of ioctl commands:
- Reset: a command sent by a user-space application to instruct the driver to reset the device.
- Start: sent by the application to instruct the driver to start a new compression stream with a specific compression level.
- Finish: sent by the application to notify the driver that all data to compress has been sent, and that all pre-finish compressed data has been drained.
- Get statistics: sent by the application to request from the driver a data structure containing the values present in the following device registers:
REG_STATUS,REG_ERROR,REG_TOTAL_INPUT,REG_TOTAL_OUTPUT.
This user/kernel interface must use the following 🗎 kernel user-space API header file for its definition.
Please observe how the test program in shared-folder/edu-compressor-test.c uses that interface to interact with the device file /dev/edu-compressor, to further understand how your driver should expose it to user space.
Testing the Driver
Basic functionality can be assessed with a simple user-space test program present in shared-folder/edu-compressor-test.c.
This program compresses a file using the device and decompresses the result using the software zlib implementation available in the VM, to check if the decompressed content matches the original input file.
In the VM, this test program can be compiled as follows:
alpine:~/shared-folder# gcc edu-compressor-test.c -o edu-compressor-test -lz
Note the -lz flag, needed to link against the zlib library.
We can then create a text file to compress:
alpine:~/shared-folder# echo "hello hello hello hello hello hello hello hello" > hello.txt
And run the test program:
alpine:~/shared-folder# ./edu-compressor-test hello.txt hello.z hello-restored.txt
Compressed 48 bytes to 18 bytes using level 6.
Device statistics: input=48 output=18 status=0x00000021 error=0
Verification passed: 'hello.txt' and 'hello-restored.txt' are identical.
Make sure to also test with larger files, with sizes exceeding the device’s input/output buffers (32 KB), to trigger multiple rounds of transactions between the driver and the compressor hardware.
Deliverable: Linux Kernel Patch
Kernel Patch
The one and only deliverable for this exercise is a patch for the Linux kernel containing the modifications you made to the kernel sources to implement the drivers. That patch should consist of a single file. To generate the patch, please use the following instructions.
In the container, list the files you modified and added on top of vanilla Linux v6.6:
root@container:~/workspace/linux-6.6# git status
Add all files you wish to incorporate into the patch and commit (the commit message does not matter):
root@container:~/workspace/linux-6.6# git add drivers/misc/Makefile
root@container:~/workspace/linux-6.6# git add init/main.c
root@container:~/workspace/linux-6.6# git add drivers/misc/edu-rng-sync.c
...
root@container:~/workspace/linux-6.6# git commit -m "submission"
Finally, generate the patch:
root@container:~/workspace/linux-6.6# git diff v6.6 > linux.patch
Inspect the file linux.patch and make sure that:
- It contains all files relevant to your drivers’ implementations: typically that would be Linux’s
main.cwith our synchronous RNG test integrated in the boot process, each driver’s C source file and the corresponding kernel user-space API header file; as well as any kernelMakefileyou modified to integrate your code to the build process. - It does not contain any irrelevant files: no binaries, object files, user-space code, etc.
⚠️⚠️⚠️ Double and triple check the validity of your patch: if it fails to apply to the vanilla sources of Linux v6.6, your mark will be 0. If it makes the marking more difficult (e.g., it applies with warnings or creates unneeded files), you will lose marks too. See below how to check the validity of the patch and the code you submit through it.
Even if you did not fully complete the exercise, please make sure the patch applies, or else you cannot be marked and will get 0.
Testing the Patch
A script is available to check the application of your patch on the vanilla version of the kernel sources, and to run each test that will be used for marking.
To run it, first launch a fresh container based on the lab’s image and copy your patch inside, either using drag-and-drop in a VSCode window attached to the container, or by using docker cp from the command line.
Then, inside the container, run the comp26020-check-submission command with your patch as first argument:
root@container:~/workspace# comp26020-check-submission linux.patch
You should see a log of everything happening. The script will:
- Apply the patch to the kernel sources.
- Compile the kernel.
- Run the VM and wait for it to boot.
- Using SSH connections, compile and run the test applications and test suites we have been using throughout this exercise.
⚠️⚠️⚠️ Make sure to run this script on a fresh container and not the container you are developing in: it may mess up your files.
Before submitting, please make sure you complete the submission checklist.